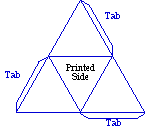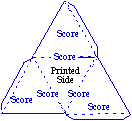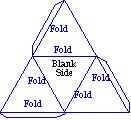
Instructions for constructing a paper pyramid.
If you read our papers:
Application of Pyramid Building in Organizations: Aligning Strategy, People and Processes' or ...
Enterprise Development: Creating Shared Meaning through Pyramid Building' ...
... you have come to the right place.
This is how a three-dimensional pyramid looks:

During construction of your first pyramid you will appreciate aspects of the task that are hard to describe in writing. If the first construction does not satisfy you, it is possible you will have discovered what it takes for a second construction to be more successful.
Materials & Equipment:
You will need:
- heavyweight printer paper e.g. 80lb. or card stock,
- sharp scissors,
- a large needle or a blunt knife,
- a hard working-surface,
- a ruler or other straight edge, and
- a glue stick.
Notes for getting high quality 3-D pyramids
Heavyweight paper is recommended. It is almost impossible to use regular 20lb printer paper because construction is very difficult, and the result is very fragile.
Printing with an inkjet printer is preferable to a laserjet because ink jet printers usually handle thicker paper more reliably, and usually have the capacity for color printing.

Instructions
1. Open the Enterprise Pyramid in print ready format in a new browser window. The new browser window is automatic and you can close the new window to return here when you are finished. It has two pyramid designs (actually two perspectives of the same pyramid):
a. Enterprise Pyramid Emergent Perspective
b. Enterprise Pyramid Foundation
Print the desired pyramid design on heavy paper or onto card stock.

2. Using the scissors, cut around the pyramid outline taking care to cut around and include the three, uncolored tabs.

Using a needle point, or a blunt knife, guided by a ruler, and with the printed pyramid page resting on a hard surface, score the paper accurately along the three sides of the central triangle and along the three pyramid edges with tags.

4 . With the pyramid design to the outside, and in turn for each score line, fold the paper over until it is flat, press the fold flat, and then re-open the fold to 90 degrees.

5. Using a glue stick, completely moisten the surface of each of the three tags, and then partially fold the pyramid closed.
6. Bring the moistened surface of one tab into complete contact with the inside of the adjoining pyramid face. Carefully align the tabÕs fold with the adjoining face edge. Complete this operation for the remaining two tabs.
7. Leave the pyramid for a few minutes so the glue can dry.
Congratulations! Hope you like what you got!
If you want a plastic or laminated pyramids of different sizes, please send us an email or call (408) 871-0462 for more information. Do you want to learn how to build pyramids? We have three pyramid building workshops coming up in California. (Sept. 22-25, 1999). Contact us now before it fills up!
For more information on pyramid-related articles, interviews and ideas, please select from the menu at the top.
Copyright 1998, 1999, The Mithya Institute for Learning. All rights reserved.